
Things to know before your first guitar lesson.
Before you start your first lesson, if you’re starting from scratch with no prior knowledge then there are a few things that can help get you ahead before you even start your first lesson!Things such as the parts of the guitar, how to hold the pick, the order number of the strings and how we number the fingers. Knowing thesethings before hand will ensure that we start learning the fun stuff as soon as we log into your first lesson instead of spending that time learning these fundamental things. I want to get you playing as quickly as possibleand if you know these simple things before hand, you can be playing your first chords by the end of your first lesson! So, let me explain.
There are 6 strings on a guitar. They range from a high note all the way down to a lower note. We consider the highest pitch, thinest string the 1st string, which isthe string furthest away from you when you hold the guitar. And then the 6th string is the thickest, lowest pitch of the strings. When tuning the strings, you tune them to specific notes ofthe musical alphabet.
The musical alphabet : A B C D E F G
Guitar strings: 1.E
2.B
3.G
4.D
5.A
6.E
The 1st and 6th strings are tuned to the same note, only that the 1st string is a higher octave and the 6th string is a lower octave of the same note. An octave is just the same note in a higher or lower register.
Now let’s take a look at the individual parts of the guitar for both electric and acoustic. They are very similar but with some slight differences
Acoustic guitar:
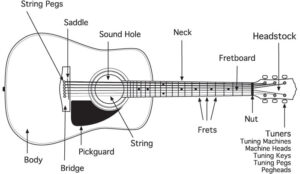
- Body (big wooden piece)
- Neck (long wooden piece)
- Fretboard (part of the neck where you put your fingers)
- Frets (horizontal metal lines across the fretboard)
- Headstock (top of the neck)
- Tuners (pegs on the left and right side of the headstock that tunes the strings)
- Bridge (wooden strip on the bottom of the body where the strings attack to)
- Saddle (white strip on the bridge)
- Nut (white strip on top of neck underneath headstock)
- String pegs (pins on bottom of the bridge)
- Sound Hole (hole in the center of the body
- Pickguard (plastic piece on bottom of sound hole
So there is a diagram of an acoustic guitar with all the individual parts labeled. The Bridge is where the strings attach on the body. The sound hole is what projects the sound of the instrument. When you strum a string, the vibration resonates through the body and projects out of the sound hole. The purpose of the pick guard is simply just to protect the guitar from scratches caused by the pick when strumming hard while playing a song. The saddle adjusts the height of the string to give it room to vibrate properly, while the nut adjusts the height on the other end of the guitar, the neck. The string pegs, also called bridge pins, lock the strings into place so they don’t fall out when you play. The Frets change your notes on each string. Like a different key on a piano, once you play different frets, the notes go up or down in pitch depending on which diction you go in. The fretboard is the portion of the neck with all the frets that is also where you will place your fingers to change the notes. The headstock is where the strings attach on the top of the guitar, while the tuners tune the strings to the proper pitch.
Electric Guitar
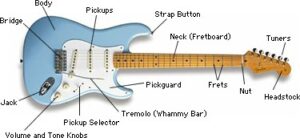
- •Pickups
- •Volume and tone controls
- •Whammy Bar
- •Jack
- •Pickup Selector
The pickups take the vibration of the strings, and converts them to an electrical signal, while the volume knob controls the over all volume of the sound. The jack is where you plug a cable in that connects to an amplifier that makes the sound of the electric guitar loud and awesome!! The pickup selector selects which of the 3 pickups that are on or off. The whammy bar is a bar attached to the bridge that when pressed down, the pitch of all the strings lowers, while when pushed up, the pitch of the strings raise.
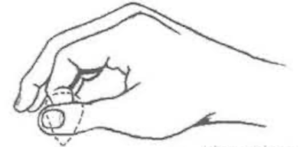
Holding a pick is very simple, and only requires two fingers on your right hand, The index and thumb! Simply make your index finger into a “hook” shape and then place the pick on the tip of your finger with the point of the pick on the bottom. Lastly, just secure it with your thumb while your other fingers hang freely while staying together.
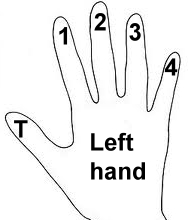
Since playing the guitar requires 4 fingers of your left hand, it is very important to understand the numbering system for each finger, that way reading things like chord charts and tablature will make sense to you, and you can practice good habits from the start and using proper fingering! Proper fingering makes a world of a difference when learning any instrument, so here is the simple numbering system for our left hand fingers :
These are a few basic things that I think are super helpful before starting your first lesson. I hope this helps!!